Setting up Facebook PIXEL (tutorial) – Wooacademy solution plugin
This tutorial guides you through setting up a Facebook pixel and Facebook events using the plugin from the Wooacademy workshop. You will also find a procedure on how to create a Facebook pixel if you have never worked with it before. Finally, you will also find the procedure for testing your Facebook pixel and events.
Obsah:
How to set up the Facebook pixel and Facebook events?
How to create a Facebook pixel?
Set up the Facebook pixel and Facebook events using the plugin
Installation of the Wooacademy solution plugin
Insert Facebook pixel ID into the plugin
autor článku: RNDr. Michaela Gallee – Facebook Marketing Partner & co-founderof the top-rated educational academy ⭐⭐⭐⭐⭐ wooacademy

Why should you use Facebook pixel and Facebook events?
Facebook pixel is almost like an obligation for anyone who creates and manages paid campaigns on Facebook or Instagram. Thanks to the Facebook pixel, you can set your campaigns to remarketing, which means to re-reach, for example, those who have already visited your website.
However, to reach an audience that, like someone who has left full shopping carts without completing purchases, you still need to set up Facebook events. With Facebook events you can prepare the entire list of conversions that take place on your site, such as: viewing a product, adding a product to your cart, going to the checkout, or making a purchase.
Thanks to Facebook events you can measure the success of your campaigns, that means whether your campaigns brought you purchases, how many there were, and in what value. At the same time, thanks to Facebook events, you can set up conversion campaigns. You can simply tell Facebook the goal of the campaign: purchases, additions to the cart, or any other conversion that you have marked and that you want to achieve.
Even if it might seem like that, the usage of Facebook events is not limited only to e-shops. If you are a charity, you can mark the event as “donate” (when someone contributes to the organization). If you provide services, your conversion may be, for example, a lead who submits a contact form. If you have a website just with the blog, your conversion may be that someone contacted you.
However, our Wooacademy solution plugin is focused on e-shops, which means that you can automatically set up conversions for the e-shop as:
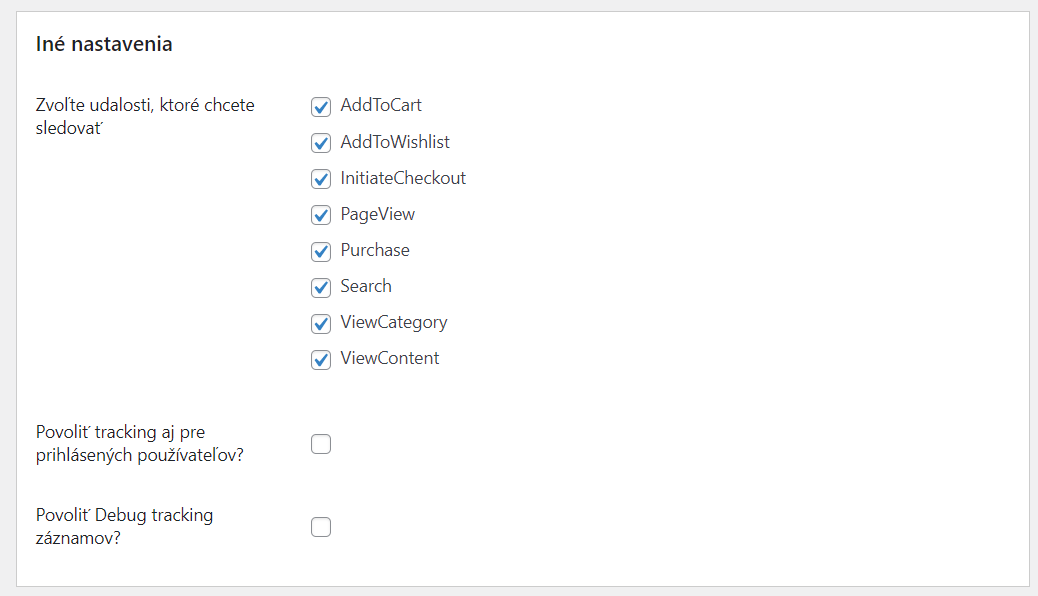
- AddToCart – add to cart
- AddToWishlist – add to the wish list
- InitiateCheckout – go to the cash register
- Purchase – shopping
- Search – search
- ViewCategory – open the product category
- ViewContent – product detail
How to set up the Facebook pixel and Facebook events?
A Facebook pixel is a code that needs to be pasted into your website. You can paste it either directly into the page code, using the Tag Manager, or using various plugins that have been developed for this purpose.
However, its setup can be accompanied by many technical and unexpected problems. From the fact that the pixel is not active, to the crash of the web page if it is inserted into the web page incorrectly. Plugins that are incompatible with the webpage may also crash the page.
That’s why we’ve created a plugin for you to simplify the whole process. By entering the ID number of your pixel, you will easily set not only a Facebook pixel but also Facebook events (conversion events) for the e-shop.
How to create a Facebook pixel
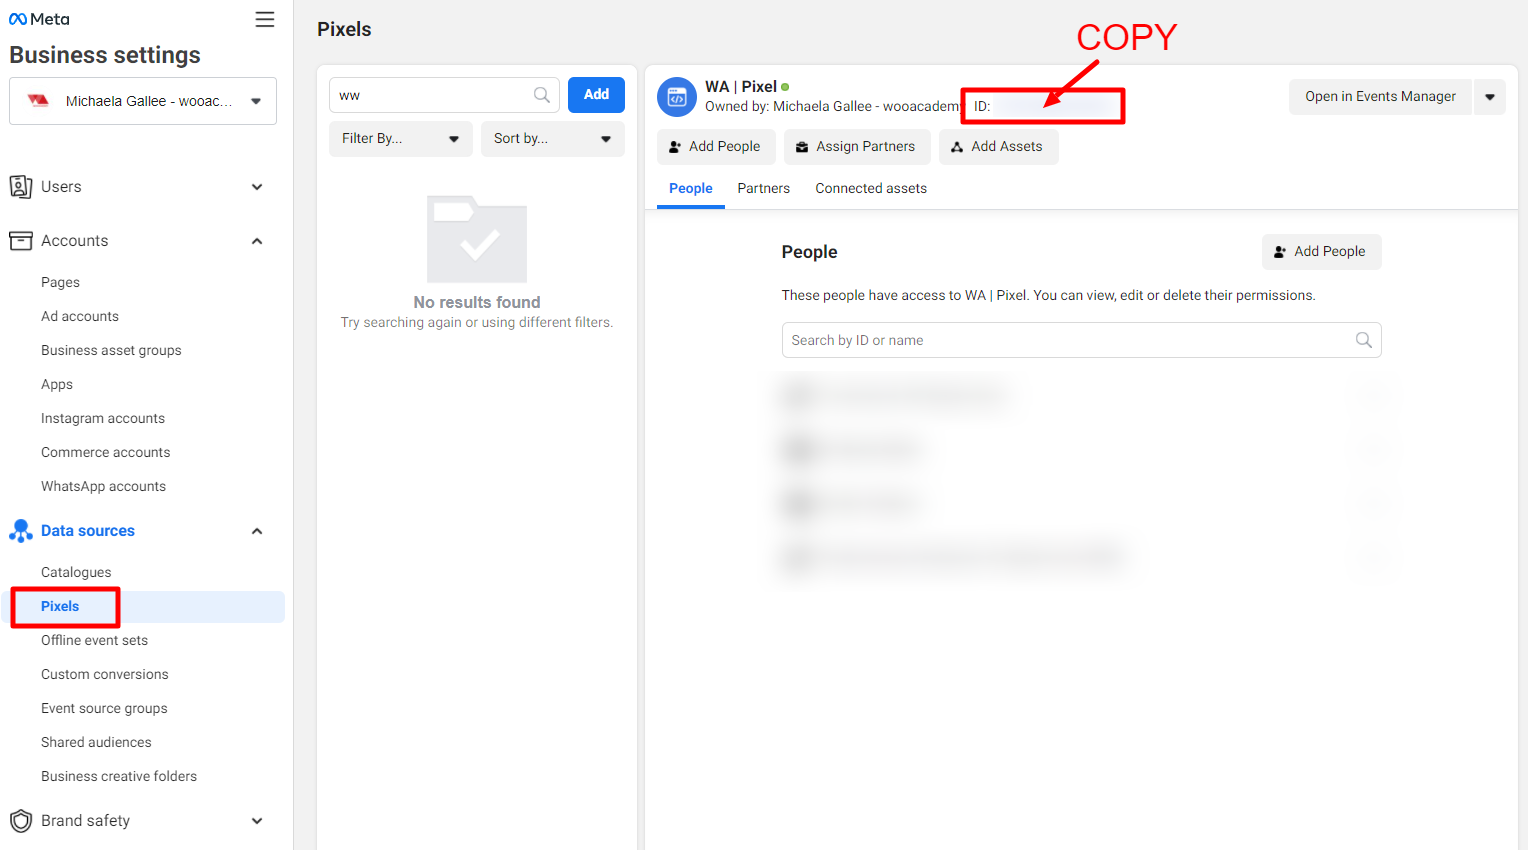
Visit Business Manager, Business Settings (https://business.facebook.com/settings) → Data Sources → Pixels. Click the blue Add button.
In the pop-up window, name your pixel and enter the website address in the second field. Click Continue.
Select Facebook pixel and click connect.
Select Install code manually.
Click the blue-button Continue, when the window Set Up Events shows click Cancel.
Return to corporate settings (https://business.facebook.com/settings/). Your new pixel will appear in the settings. Copy the ID number of your new pixel.
Set up the Facebook pixel and Facebook events using the plugin
You can set the Facebook pixel and conversion events for your e-shop by simply entering the ID number of the Facebook pixel into the Wooacademy solution plugin in the Facebook tracking section. The plugin was developed only for WordPress sites. If you have another solution and have problems with settings, do not hesitate to contact us.
Installation of the Wooacademy solution plugin
If you haven’t downloaded the plugin yet, you can find it at this link: https://wooacademy.sk/en/produkt/facebook-pixel-free-plugin-wooacademy/
If you are only interested in setting your Facebook pixel and Facebook events, you do not need to select any extensions for the plugin. If you also want to verify the domain using the plugin, set up the Facebook conversion API, and set the GDPR, don’t forget to check the other components of the plugin as well.
Be sure to insert your domain when purchasing the plugin. After purchasing the wanted type of plugin you can download it directly on the thank you page or by clicking on the link you will receive in the e-mail.
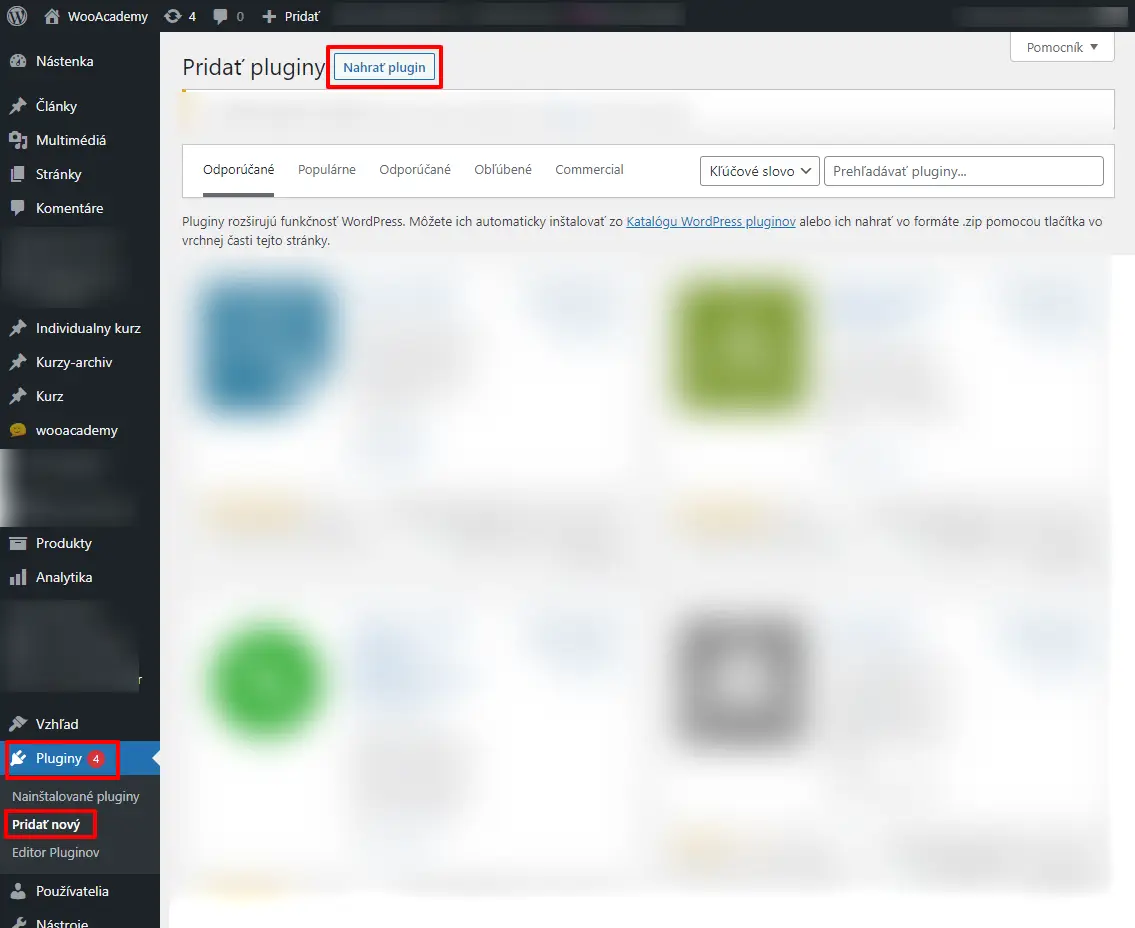
Log in to the website (you would need to be able to access it as an admin). Find the Plugins tab on the left, click Add New, and then the Upload Plugin button.
Click Select File.
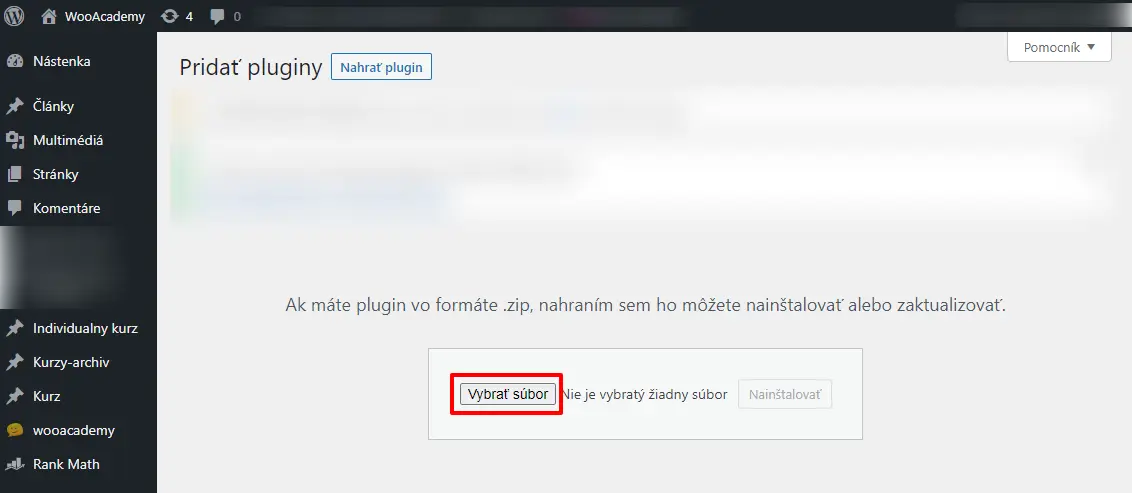
Add FB CAPI WordPress plugin
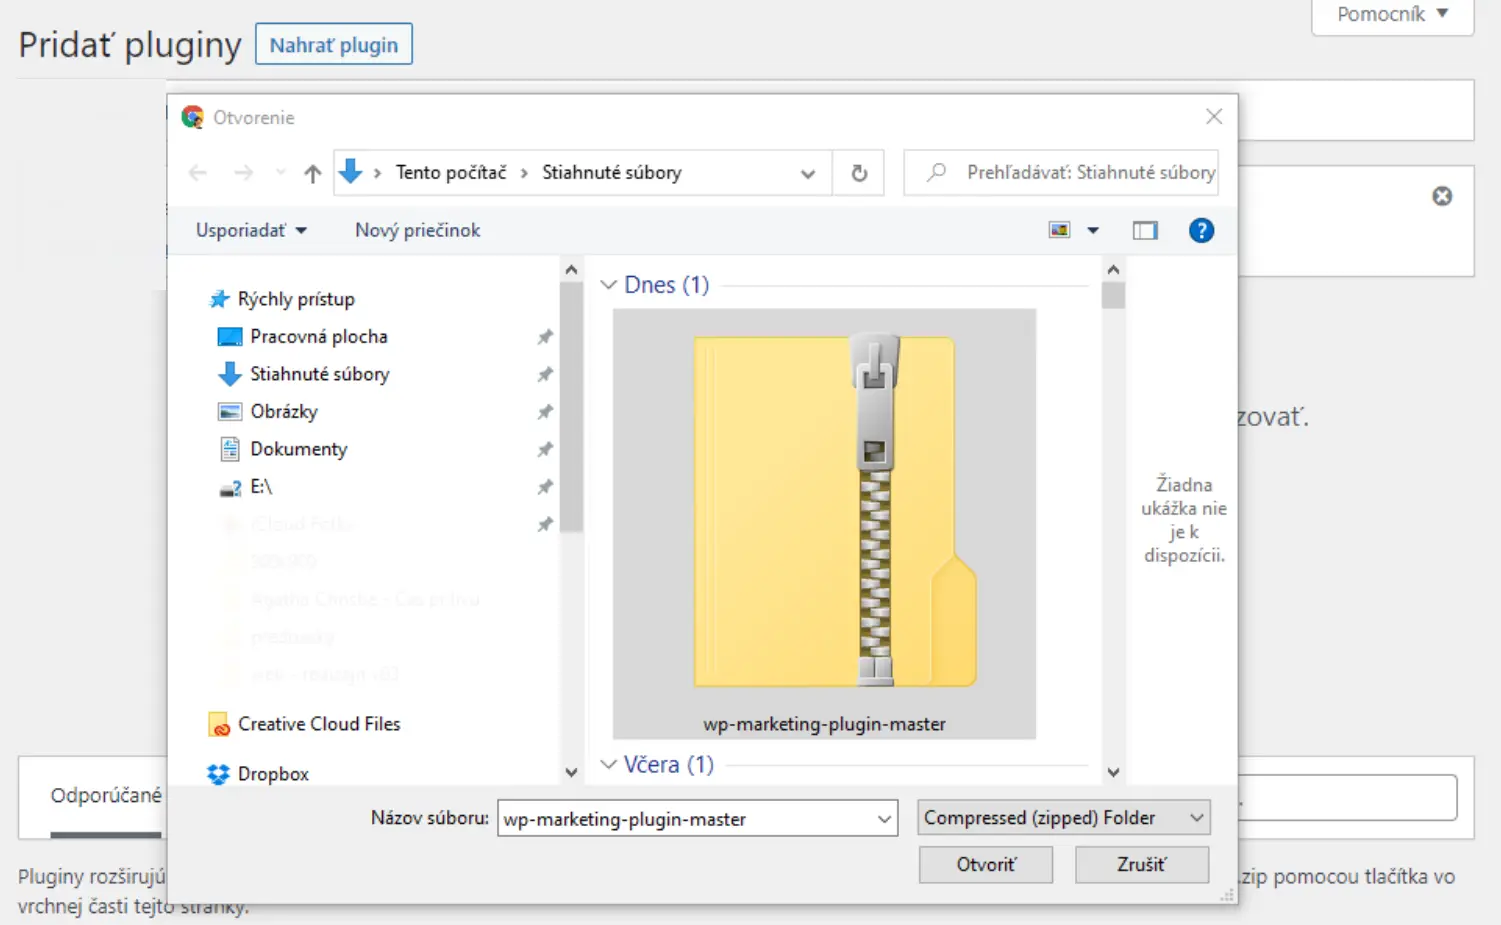
Select the plugin in the zip file you downloaded.
Select a plugin from your computer
Click the Install button.

The plugin has been successfully installed.
You can find the plugin in the left column under the name wooacademy solutions.
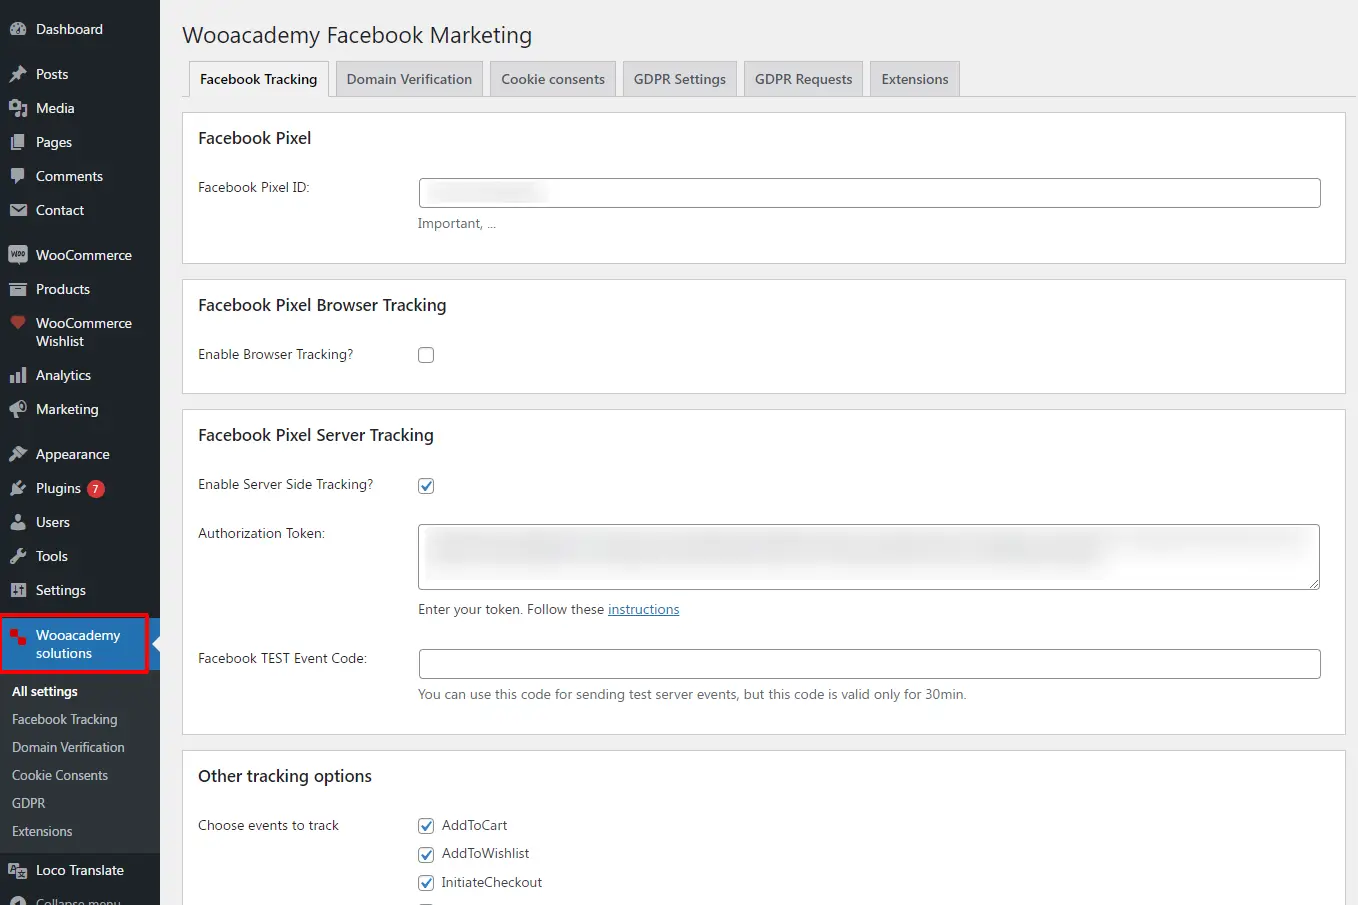
Inserting Facebook pixel ID into the plugin
Start in the left column under Wooacademy solutions. In the Facebook Tracking section, enter the pixel ID in the marked box. Be sure to check the Enable Browser Tracking box.
If you have only purchased a plugin for setting Facebook pixels and events, you will not see other components of the plugin such as Domain Verification, Cookie consents, GDPR setting, and GDPR requests.
You can also set up conversion events for Facebook automatically. If there are events you don´t want to measure, you can select them by unchecking the box next to that conversion. We recommend you check all events.
Facebook pixel and Facebook events testing
Open the Event Manager in the Business Manager: https://business.facebook.com/events_manager
Click on Test Events, enter the URL of your website in the box under the Test browser events and click the blue Open Website button. This will open your website in a new window.
Clicking between the Events Manager windows and your website, the test window will show you the events you have set.
You will see PageView first. Purchase on the website and check each step in Events Manager to see if events are being collected correctly. View content to open the product detail, Add To Cart to add to cart, and so on until you complete the purchase.
Possible complications
1. There are no events displayed
You may have the ad blocker enabled, or you have not agreed to the collection of cookies on your website, or you do not have the collection of cookies enabled in your browser. Some browsers are not suitable for testing, such as Safari.
2. Events are collected twice
You may have set both pixel and events in the past, old settings need to be removed.
3. The plugin does not work
You may have an old version of the WordPress site and the plugin is not compatible with your version. We, therefore, recommend that you update WordPress to the latest version. In addition, some changes may have been made directly to the code within the website. This can lead to conflicts that can affect the functionality of the plugin.
Buy wooacademy GDPR – FB CAPI plugin 2022 ⭐⭐⭐⭐⭐

O autorovi
RNDr. Michaela Gallee
Facebook Marketing Partner
“Spoluzakladateľka wooacademy. Špecializuje sa na sociálne siete, najmä na výkonnostné aj brandové kampane na Facebooku a Instagrame. Spravuje kampane pre veľké módne značky, pre automobilový priemysel aj pre slovenské média. Úspešne pomáha rozbiehať aj úplne nové a neznáme značky, práve vďaka skvele nastavenej social stratégii.”